How to remove a Microsoft account from Windows 11
A Microsoft Account is one of the best ways to experience Windows 10 and Windows 11. It allows you to sync your settings across devices, download apps from the Microsoft Store, and a lot more.
ContentsYet for those who might be coming from older versions of Windows, where you didn’t need such logins, things might seem tricky. Microsoft is making it harder to avoid using a Microsoft Account by making it mandatory in Windows 11 Home. So. how do you remove the account? We’re here to help you out.
Removing a Microsoft Account during a fresh setup
We’ll start first with one of the most common scenarios you might face — removing a Microsoft Account after the process of a clean install or if you’re setting up a new PC that you just purchased. This might be of issue in Windows 10 Home, as we hinted at the top of our introduction. The easiest way to get around this limit is to set up Windows with a Microsoft Account and then add a “local” offline account in its place afterward.
Basically, you can create a free throw-away Microsoft Account (not tied to your real name or credit card, etc) and then sign in with it during the Windows 11 setup process. When setup is finished, don’t download any apps or transfer any files. Instead, you can jump straight to our steps below to imminently remove the account you just added itself in place of a new “local” one not tied to a Microsoft ID.
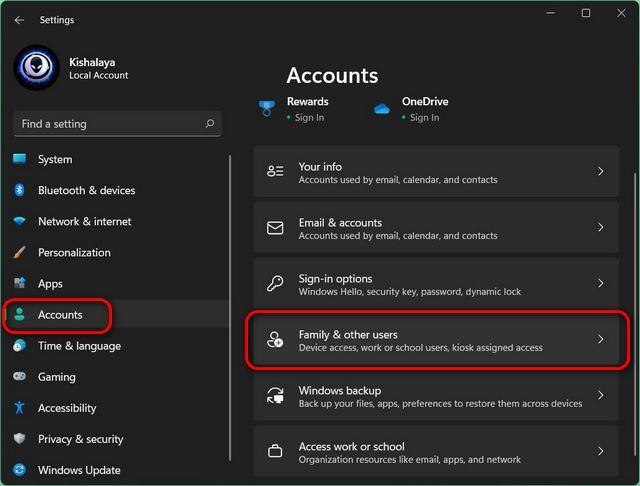
Step 1: Go to Windows 11 settings with Windows Key and I on the keyboard.
Step 2: Click the Accounts section in the sidebar.
Step 3: Click Family & Other Users.

Step 4: Under Other Users click Add Account.
Step 5: In the setup box, choose I Don’t Have This Person’s Sign-in Information.
Step 6: Choose Add User Without a Microsoft Account.
Step 7: Add an account with your name and password.
Step 8: Change the account type to an administrator with the Change Account Type button.
Once you follow those steps, log out of the account on your PC which has the Microsoft Account. Log into your new local account. Follow steps 1-3 again, and then choose the old Microsoft Account under other users and click the Remove button. This will remove that Microsoft Account from your PC, leaving you with only a local account.
Convert a Microsoft Account to a local account
If you’re already using a Windows 11 PC with a Microsoft Account, then you can remove it manually in favor of a local account instead. Here’s how to do this. With this method, you don’t lose any files or your personal information.
Step 1: Go to Windows 11 settings with Windows Key and I on the keyboard.
Step 2: Click the Accounts section in the sidebar.
Step 3: Click Your Info and choose Sign in with a local account instead.
Step 4: Click next and enter your password to confirm.
Step 5: Follow the steps on the screen and enter your information.
}})