How to screenshot on a Mac
Contents
There are multiple ways to take a screenshot on a Mac (or if you are arriving here from the PC world: print screen on a Mac). We'll run through the different key combinations and the various refinements you can make to screenshots so that, for example, you can crop them to a particular size, or take a screen grab of an area that is bigger than your screen. We'll also look at what to do when you can't screenshot what you want because you need to be interacting with your screen to capture it.
Many of the methods below will work in all versions of macOS, but there were a number of changes to the screenshot options that arrived in macOS Mojave in 2018, so if you aren't running Mojave or later then you may not have access to them.
In this article, we show you how to take a screenshot of something on your Mac's display, we'll also discuss how you can edit it, and where the image will be saved - since lots of people are unclear about where screenshots go on the Mac.
Screenshots are saved to your Desktop by default, although you can change where your screenshots are saved. Generally your screenshot will save as a .png file, which you may want to open in Preview or a similar image viewing program, and then Save As with a different file type extension. We discuss ways to change the format your screenshot is saved in below.
Which buttons screenshot on Mac?
There are actually various key combinations you can use to take a screenshot on a Mac, we'll run though each below:
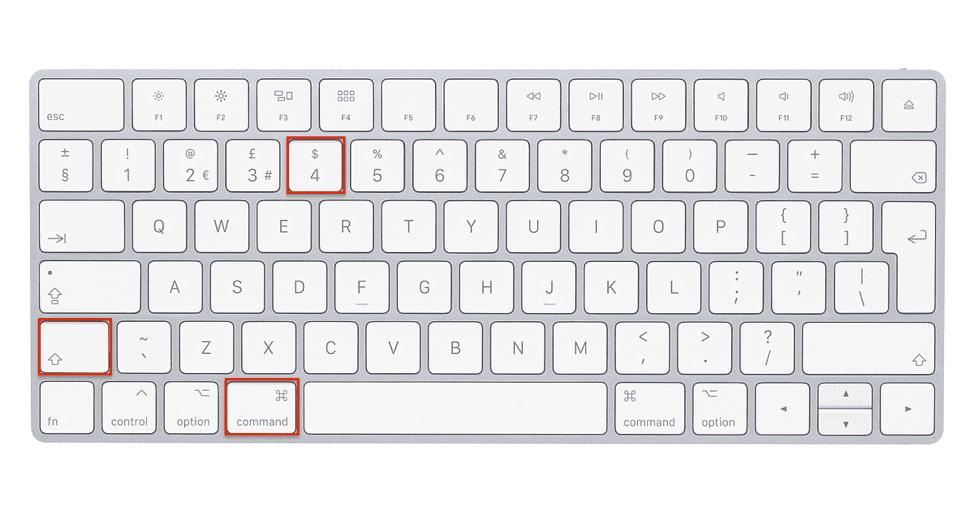
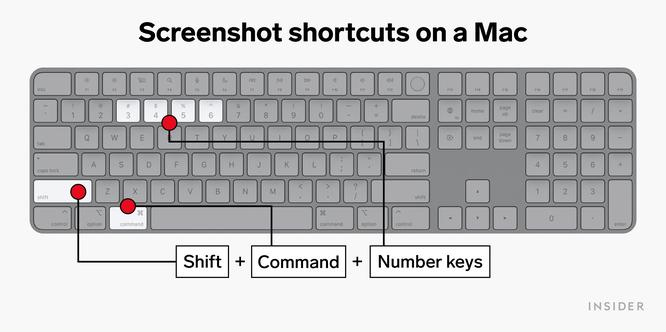
Press Command + Shift + 3 to take a screenshot of the whole screen.
If you have more than one screen it will grab two screenshots, one of each screen.
By default these will be saved to your desktop.
This is the best option if you want to take a screenshot of a selected area rather than the whole screen.
If you want the screen shot to be a certain dimension you could use the pixel measurement that appears beside the crosshairs. You could, for example, drag until the measurements are 500 x 500 if you wanted to screenshot a square.
Command + Shift + 5 is an option that arrived in Mojave, so as long as you have updated the operating system since 2018 you will have this ability.
Press Command + Shift + 5 and you will see a pop up appear on your screen with a number of options. These include: Capture Entire Screen, Capture Selected Window and Capture Selected Portion.
There are also options so you can make a screen recording of what's happening on your screen: Record Entire Screen and Record Selected Portion.
We often choose the Capture Selected Portion option which we have set to a certain dimension. This way we can always create screenshots at the same size.
Tips for better screenshots
Try these tips below to fine-tune your screenshots:
Where are screenshots saved on Mac?
By default, Mac screenshots are saved to the desktop. But in Mojave or later, you can choose a variety of other places where your screenshot can be saved.
If you were to use an app such as Grab (available in earlier versions of macOS) to take your screenshots then they might end up elsewhere. Grab is likely to save the screenshot to your Documents folder - and if you don't change the name of the image it will save as Untitled.
It is possible to change where screenshots are saved in Mojave or later:
We have a separate article about changing where your screenshots go if you want more information, including details of how to change the location of screenshots in High Sierra and older versions of Mac software.
How to choose dimensions of screenshot
There are a number of reasons why you might need a screenshot to be a certain size. Perhaps you have been asked to provide an image that's a specified number of pixels, a specific size, or maybe you want to take a number of screenshots that are the same dimensions.

You might be thinking you need to edit the screenshot after you've taken it to achieve this, but actually you can choose the dimensions of the screenshot as you take it - and use the same dimensions again.
If this is a one off and you need to take one screen shot at specific dimensions do this:
If you frequently have to take images that are the same size - for example, we use 1,600 x 900 images so that tends to be our default - you could set up your crosshairs in advance by using Command + Shift + 5. Here's how:
How to screenshot a window
What if you want to screengrab or screenshot a single window on your desktop?
There are two ways to do this. You could press Command + Shift + 5 and choose Capture Selected Windows. Alternatively:
Click to take a screenshot of this window only - and the resulting image will have a nice shadow effect, too.
If the shadow is a distraction from the image you can take a screenshot without it:
The same technique can be used to screenshot menus: Open the menu you want to screenshot:
You'll get a screenshot of the menu (although it won't include the title at the top of the dropdown - to screenshot that you'll need to use the standard Command + Shift + 4 and judge the selection by eye).
And it doesn't stop there. You can use the same technique to capture neat screenshots of other screen furniture that you might not think of as windows. Here's a screenshot of our Dock, which we grabbed in the same way - Command + Shift + 4 and then Space:
You can also capture the top bar, certain elements of the top bar on the right-hand side, or all the icons on your desktop with the top bar, Dock and wallpaper image removed.
How to take a timed screenshot
Some times it appears to be impossible to take a screenshot of what you want to capture because you need to be interacting with the software at the same time as you need to be grabbing the screenshot. Luckily there is a way to do this.
To take a timed screenshot (Mojave or later) you need to do the following:
If you are in an older version of macOS or Mac OS X you can use Grab to take a timed screenshot. Press Command + Space and start to type Grab, or search through the Utilities folder (which you'll find in the Applications folder.)
Launch Grab and click Capture in the top menu; you'll see options for the usual screen captures (a small Selection, a Window, or the entire Screen, each one with a shortcut that you can use to access it in future) but also includes the handy option of timed screenshots (select Timed Screen), for when you want to set up a capture and then activate whatever it is you want to grab. The timer is 10 seconds.
How to edit a screenshot on Mac
One of the most useful features in more recent versions of macOS is the ability to edit screenshots without opening an application to do so.
When you take a screenshot (macOS Mojave or later), a thumbnail of it will appear in the bottom right corner of your screen. If you click on that the image will open in what Apple refers to as Quick Look, with various tools for drawing, highlighting, adding shapes, text boxes and even adding your signature to the screenshot.
If you miss the thumbnail you can easily open and edit the screenshot in the Preview app that is included as part of macOS. You can even click on the screenshot on the Desktop and press the Space bar to open the same Quick Look view that lets you make edits without opening the Preview app itself.
Here's how to get at those editing tools:
There are various ways to crop a screenshot. You could take the screen shot in the dimensions you need as per the advice above, but if you'd prefer to refine it afterwards here's what to do:
How to save a screenshot as JPEG
Mac screenshots are saved as a PNG file by default. The format has its benefits - its uncompressed so you won't lose any detail, for example, but it has a large file size. If you want your screengrab to be as small
Since Apple removed Grab in the update to Mojave it also removed a really simple way to save a screenshot as a JPEG or TIFF file. The easiest way to change the format that your screenshot is saved as would be to open it in a photo editing app, such as Photos or Preview or Photoshop and Save As.
However, if you are feeling confident enough, you can make a change in Terminal that should mean your Mac always saves a screengrab as a .jpg, for example.
In older versions of macOS, you can use Grab to save screenshots as JPEG rather than PNG files. It is also possible to choose to save your shots as PNG or TIFF.
Fixes for Mac screenshot problems
If you are having problems taking screengrabs on your Mac we might have the answer below.
This is not an uncommon occurrence, unfortunately.
If you've carefully followed the instructions above and you're sure the selection, window or screen that you targeted for screenshot contained graphical elements but these now aren't showing up in the image captured, the chances are that the software you were using has chosen specifically to block screenshots. For example, you may not be able to screenshot a visual in the Netflix app.
You should be able to get around the problem by using either a different piece of software that does the same thing.
If you are taking screenshots and they aren't appearing on your desktop it might be that you were accidentally pressing ctrl at the same time - which would copy the shot to your pasteboard.
If it's not as simple as that, go to System Preferences > Keyboard > Shortcuts and check that the shortcuts are activated under Screen Shots.
Another possibility is that the usual shortcuts have been assigned to something else, so double-check that here in System Preferences too.
}})