How to Install Chrome OS Flex on Your Windows PC, Laptop, and MacBook
Google has released Chrome OS Flex to breathe new life into aging Windows PCs and older MacBooks. We have already written a detailed guide on how to install Chrome OS with Play Store support on a PC, but it’s based on Project Brunch,and the installation process is quite a hassle. However, with Google directly supporting third-party hardware, Chrome OS Flex stands out with its seamless installation process and longer support window. I tried the new Chrome OS Flex OS on my Windows laptop, and it worked like a charm. So if you wish to learn how to install Chrome OS Flex on PCs and Windows laptops, follow our detailed guide below.
How to Install Chrome OS Flex (2022)
In this guide, we have included step-by-step instructions to install Chrome OS Flex. Along with that, we have explained what is Chrome OS Flex and my experience with Google’s new OS. You can expand the table below and learn about all the technicalities.
Table of ContentsWhat is Google Chrome OS Flex?
Two years back, Google acquired Neverware, a New York-based company that was developing CloudReady. It allowed users to breathe new life into older PCs and run Chrome OS. CloudReady was built on the open-source Chromium OS base. They have also added Linux support recently. Google took over the project and has now released Chrome OS Flex (aka CloudReady 2.0) based on Chrome OS — Google’s official desktop OS with support for Google Assistant and other Google services. There is Linux support too, but Google Play Store is not available on Chrome OS Flex.
Currently, Google is primarily offering Chrome OS Flex to Education and Enterprise users for free. But regular users can also install Chrome OS Flex on their older Windows PCs and MacBooks. The aim behind this project is to utilize old hardware and offer speedy performance, almost on par with modern computers. As Google is now maintaining the project, we can also expect greater support from a myriad of different manufacturers, including HP, Apple, Asus, and more.
Requirements To Install Chrome OS Flex
1. A USB pen drive with at least 8GB or more storage.
2. Windows PC with an Intel or AMD x86-64-bit processor. ARM processors are not supported yet.
3. At least 4GB RAM or more.
4. Internal storage must be 16GB or more.
5. Check your PC’s compatibility from here. If your PC is on the list, you are good to go. In case your model does not appear in the list, do not worry. You can still proceed with the installation. Chrome OS Flex works even on non-certified PCs, as we have tested below, it’s just that some of the functionalities might be limited.

Flash Chrome OS Flex On USB Drive
1. First, go ahead and install the Chromebook Recovery Utility Chrome extension using the link here. It’s an extension that will allow you to flash the Chrome OS Flex build on your USB drive.
2. Next, open the Chromebook Recovery Utility and plug in your USB drive. After that, click on “Get Started“.
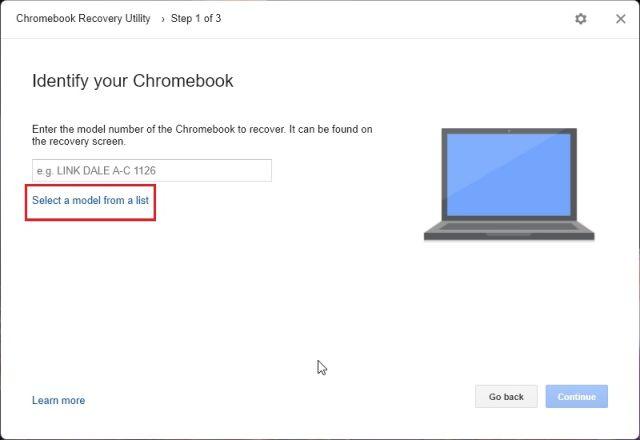
3. On the next page, click on the “Select a model from a list” option.
4. Click on the “Select a manufacturer” drop-down menu and choose “Google Chrome OS Flex“. From the next drop-down menu, select “Chrome OS Flex (Developer-Unstable)”. Now, click on “Continue”.
5. After that, select your USB thumb drive and click on “Continue“.
6. Finally, click on “Create now“, and the Chromebook Recovery Utility will create a bootable Chrome OS Flex drive. The whole process will take anywhere from 10 to 15 minutes, depending on your internet speed.
Install Chrome OS Flex on Windows Laptop or MacBook
1. Once the flashing process is complete, restart your PC and press the boot key. If you don’t know the boot key for your computer, check the table below. Keep pressing the boot key until you see the boot selection page. If you are installing Chrome OS Flex on a custom-built PC,find the boot key based on your motherboard manufacturer from the internet.
2. On the boot selection page, select your USB drive using the arrow keys and hit Enter.
3. Now, the “Welcome to CloudReady 2.0” screen will appear. Here, click on “Get Started“. Now, go through the on-screen instructions and sign in with your Google account.
4. I suggest you explore Chrome OS Flex first before installing it on your hard drive. This way, you can check the compatibility of your Wi-Fi, keyboard, mouse, Bluetooth, touchpad, and other hardware devices.
5. Once you are sure that you want to install Chrome OS Flex, open the Quick Settings panel from the bottom-right corner and click “Sign out“.
6. Next, click on “Install CloudReady” at the bottom-left corner.
7. Finally, click on “Install CloudReady 2.0” and then click on “Install” again. Note that this step will wipe your complete hard drive, so make sure to take a backup before performing this action. Once the installation is complete, shut down your computer and remove the USB drive.
8. And that’s it. Chrome OS Flex will boot up on your device without any issues.
Chrome OS Flex on a Windows Laptop: First Impressions
It’s safe to say that Chrome OS Flex is quite performant in comparison to Windows 11 or 10. I use an 8th-gen i5 Chromebook regularly, and in contrast, the performance with Chrome OS Flex on my 6th-gen Windows laptop is on a different level. The surprising part is that Google has added Google Assistant support in Chrome OS Flex, which is awesome. However, do note that there is no Android app support, and Google has not announced that it will add Play Store to this build in the future.
Nevertheless, there is full-fledged Linux support, and that is great in itself. You will be able to use desktop-grade Linux apps on your Chromebook. And with Wine, you can even run lightweight Windows apps on your Chromebook powered by Chrome OS Flex.
By the way, the current Chrome OS Flex build is based on Chrome OS 100, which is amazing. In a month or two, Chrome OS Flex will become stable for anyone to boot and use. To sum up, Chrome OS Flex is a great alternative if you have an aging PC or MacBook and need something for casual browsing and day-to-day tasks.
Will You Install Chrome OS Flex on Your PC or Laptop?
So that was our guide on how to install Chrome OS Flex on aging PCs and Windows laptops. Although I didn’t test Chrome OS Flex on an Apple MacBook, rest assured, the installation steps are similar, so you can give it a try. Apart from that, I attempted to dual-boot Chrome OS Flex with Windows 11 side-by-side, but currently, the bootloader has some issues. When we have it working properly, we will surely let you know. Anyway, that is all from us here. If you wish to learn about the best Chrome OS tips and tricks, go ahead and check our detailed article linked here. And if you have any questions, comment down below and let us know.
TAGSChrome OS FlexChromebookfeaturedWindows110 Comments}})