Windows 11: How to Download Windows 11 ISO File and Install From USB
Windows 11 is officially out. But unlike Windows 10, the list of supported PCs is short. Windows 11 is currently rolling out on new laptops and desktops. It will eventually arrive on older PCs given that the device meets the minimum requirements. You can check if your laptop or PC supports Windows 11 using the PC Health Check App. Although, it’s not a deal breaker as you can still install Windows 11 manually on your unsupported PC by downloading the Windows 11 ISO file and creating a Windows 11 bootable USB.
Also Read: How To Install Windows 11 on Your Laptop or PC [Full-Guide]
How to Create Windows 11 Bootable USB With Media Creation Tool
On Windows 11, the media creation tool can be used to create a bootable USB for Windows 11. Generally, this method is used to install a fresh copy of Windows 11. But it also works if your system doesn’t support Windows 11. Before installing Windows 11 from the USB, make sure to back up all your personal data.
Now, connect an 8GB or higher USB stick to your computer and follow the instructions below –
1. Go to the Windows 11 download page.
2. Click on Download now under the “Create Windows 11 Installation Media” section.
3. Open the downloaded exe file and click on Accept.
4. Click on the Next button.
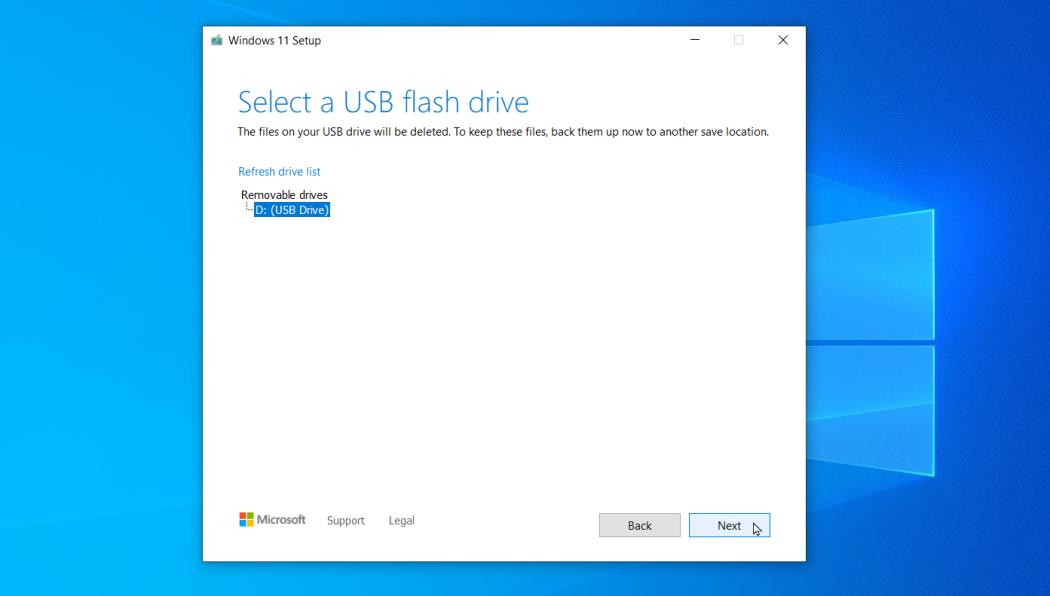
5. Select the USB Flash drive option and click on Next.
6. You will now see your USB flash drive on the list.
7. Click on Next.
8. Wait for it to add the Windows 11 setup to your USB flash drive.
Once the download is complete, you can launch the Windows 11 setup wizard and continue with the installation process.
How to Download Windows 11 ISO File and Create a Windows 11 Bootable USB
If you don’t want to use the Windows Media creation tool, you can download Windows 11 ISO file and mount it on a USB flash drive. To do this, you will need the latest version of the Rufus tool.

1. Head to the Windows 11 download page.
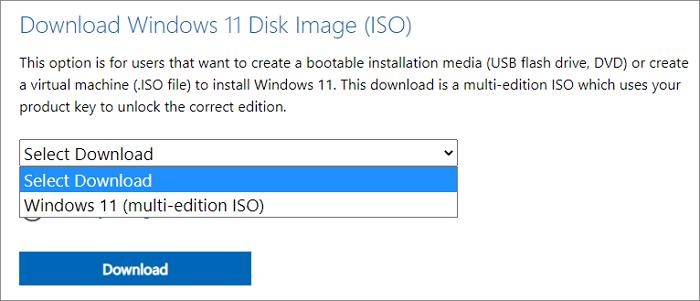
2. Select Windows 11 from the drop-down menu under the “Download Windows 11 Disk Image (ISO)” section.
3. Click on Download Now.
4. Select the product language.
5. Click on Confirm.
6. Now, click on the 64-bit download button.
7. Once the download is complete, mount the ISO file and copy all of its content onto a USB flash drive.
We would advise you not to touch other options in the Advanced settings unless you know what you’re doing.
How to Boot From the Windows 11 Bootable USB Flash Drive
Once you have created a Windows 11 bootable USB, you need to make sure that your computer boots from the USB. To do that, you will need to change the boot order in BIOS settings. To do that, follow the steps below –
1. Go to Start and open Settings.
2. Click on Update and Security.
3. On the sidebar, click on Recovery.
4. Click on Restart Now under the Advanced Startup section.
5. Click on Troubleshoot and then click on Advanced options.
6. Click on the UEFI firmware settings and click on Restart.
7. In the firmware settings, find the Boot options and change the boot order.
8. Save the changes.
Alternatively, you can access the motherboard firmware settings by pressing the F12 key multiple times as soon as your PC starts. It might be a different key to open the firmware settings depending upon the device manufacturer. Once you have changed the boot order, a restart should open up the Windows 11 setup wizard. Once you are there, simply follow the on-screen instructions to install Windows 11.
Also Read: List of Intel, AMD and Qualcomm Processors Compatible and Official Minimum System Requirements
Microsoft has previously said that older systems that don’t officially support Windows 10 are not entitled to receive cumulative or security updates. If you are installing the new Windows version manually, note that for every new update you will have to download the Windows 11 ISO file and install the update manually. Although Microsoft might change its stance on the subject in future, for now it’s important for you to know this.
Thanks for reading till the end of this article. For more such informative and exclusive tech content, like our Facebook page
}})